Download and install Hololight Space Client
Download and install
There are two ways to install Hololight Space Client:
-
Install from the store (recommended)
If your XR device is connected to the internet, the easiest method is to install the client directly from the app store. -
Install via sideloading (manual method)
If your device doesn’t have internet access, you can install the client manually using a Windows computer. This method requires you to download the installer from our website and sideload it onto the device.
Microsoft HoloLens 2
Download Hololight Space Client for Microsoft HoloLens 2 from the Microsoft Store
-
On your Microsoft HoloLens 2, open the Microsoft Store.
-
Select the search bar at the top.
-
Type "Hololight Space", then select it from the results.
-
Select Get to download and install the app.
Download Hololight Space Client for Microsoft HoloLens 2 from our website
-
Using an internet browser, go to the Hololight Space downloads page.
-
Select Download Latest Clients > Hololight Space > HoloLens 2 > Download to download the ZIP file.
-
Right-click the downloaded ZIP file and select Extract All.
NOTE: Before continuing, make sure your Microsoft HoloLens 2 is turned on. Your PC and your Microsoft HoloLens 2 need to be connected to the same network.
Enable developer settings on Microsoft HoloLens 2
Your Microsoft HoloLens 2 needs to have certain developer settings enabled. Follow the instructions below to enable developer mode.
-
On your Microsoft HoloLens 2 select Settings > Update & Security > For Developers
-
Set Developer Mode to ON
-
Set Device Portal to ON. Your device’s IP address is also shown on this screen.
| To find your Microsoft HoloLens 2’s IP address anytime, select Settings > Network & Internet > Properties. Scroll down to find your IPv4 address. |
Install Hololight Space Client on Microsoft HoloLens 2
-
On your PC, open a browser and enter the IP address of your Microsoft HoloLens 2 to access Windows Device Portal.
-
In the sidebar, navigate to Views > Apps.
-
Select Deploy apps > Local Storage.
-
Select Select the application package > Choose File.
-
Browse to the folder you extracted from the ZIP file you downloaded.
-
Select the file named "Space_<VERSION_NUMBER>_arm64_bundle_Master.appxupload".
-
Select Install.
Meta Quest devices
Download Hololight Space Client for Meta Quest from the Meta store
You can download Hololight Space Client directly from the Meta store on your Meta Quest 2, Meta Quest Pro, Meta Quest 3, or Meta Quest 3S.
-
On your Meta Quest device, open the universal menu and select Store.
-
When the store opens, select the magnifying glass icon.
-
In the search bar, enter "Hololight Space".
-
Under Apps & Games, find and select Hololight Space.
-
On the Hololight Space page, select Get.
Download Hololight Space Client for Meta Quest from our website
You can also download Hololight Space Client from our website and install it using the Meta Quest Developer Hub. Before continuing, make sure this tool is installed on your PC. Then follow the steps outlined on Meta’s page Get Started with Meta Quest Developer Hub.
-
On the PC where you’ve installed the Meta Quest Developer Hub, open an internet browser and go to the Hololight Space downloads page.
-
Select Download Latest Clients > Hololight Space > Meta Quest 2 / 3 / 3S / Pro > Download to download the apk file.
-
Connect your Meta Quest to the PC using a USB-C cable.
-
On your Meta Quest, allow the USB connection when prompted.
-
Open the Meta Quest Developer Hub on your PC.
-
Once the apk file is downloaded, select Device Manager in the Developer Hub.
-
Select Add Build.
-
Select the downloaded apk file, then select Open.
-
Wait for the installation to complete.
NOTE: In some cases the Meta Quest requires a restart after installing Hololight Space Client this way. Restart your device and then you can open Hololight Space in your App Library.
For more information on installing applications with the Meta Quest Development Hub, check out Meta’s page Deploy Build on Headset.
Apple Vision Pro
You can download Hololight Space Client directly from the Store on your Apple Vision Pro.
-
Turn on and put on your Apple Vision Pro.
-
In the main menu, select App Store.
-
In the top-bar, select the search bar.
-
In the search bar, type "Hololight Space".
-
In the search results, select Hololight Space.
-
Select Install to download and install the application.
PICO 4 Ultra Enterprise
Download Hololight Space Client for PICO 4 Ultra from the PICO store
You can download Hololight Space Client directly from the Store on your PICO 4 Ultra (Consumer Store) or PICO 4 Ultra Enterprise (Business Store).
-
Turn on and put on your PICO 4 Ultra or PICO 4 Ultra Enterprise.
-
In the main menu, select Store.
-
In the top-left corner, select the magnifying glass icon.
-
In the search bar, type "Hololight Space".
-
In the search results, select Hololight Space.
-
Select Install to download and install the application. Hololight Archive Download Icon
Download Hololight Space Client for PICO 4 Ultra from our website
You can also install Hololight Space Client on your PICO 4 Ultra by downloading and installing the APK file directly to the device.
-
Select Download Latest Clients > Hololight Space > PICO 4 Ultra Enterprise > Download to download the apk file.
-
Turn on your PICO 4 Ultra.
-
Connect your PICO 4 Ultra to your PC using a USB-C cable.
-
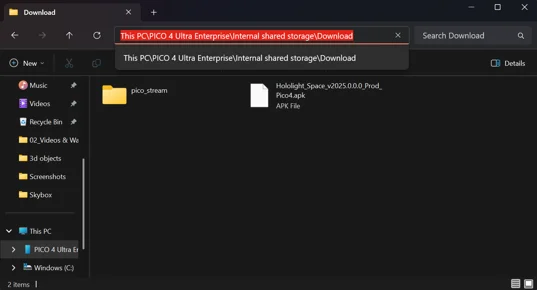
On your PC, open File Explorer and select This PC > PICO 4 Ultra > Internal shared storage > Download.
-
Copy the downloaded APK file and paste it into the Download folder.
-
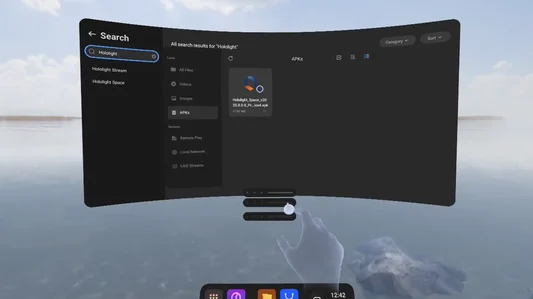
Put on your PICO 4 Ultra Enterprise and open the file browser in the main menu.
-
Go to APK files.
-
Select the Hololight Space.apk file.
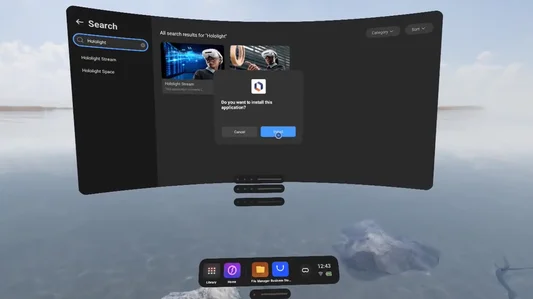
-
Select Install in the pop up window.
If you already have a version of Hololight Space Client installed on your PICO 4 Ultra and want to update it via this same process, you must uninstall the old version of Hololight Space Client first.
HTC VIVE
You can download Hololight Space Client directly from the Store inside of your HTC VIVE XR Elite, Focus Vision or Focus 3.
Download Hololight Space Client for HTC VIVE from the HTC VIVE store
-
Turn on and put on your HTC VIVE XR Elite, HTC VIVE Focus 3 or HTC VIVE Focus Vision.
-
In the main menu, select Store.
-
Select the search bar.
-
In the search bar, type "Hololight Space".
-
In the search results, select Hololight Space.
-
Select Install to download and install the application.
Download Hololight Space Client for HTC VIVE from our website
You can also install Hololight Space Client on your HTC Vive device by sideloading the APK.
-
Select Download Latest Clients > Hololight Space > HTC VIVE Focus 3 / Focus Vision / XR Elite > Download to download the apk file.
-
Turn on your HTC VIVE device.
-
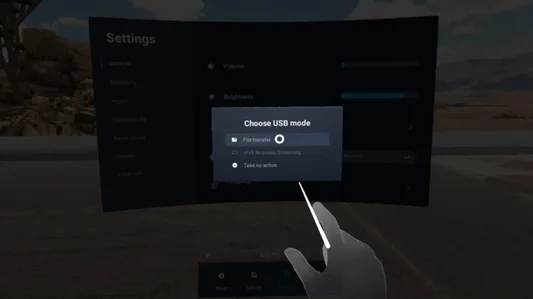
Connect the HTC VIVE device with a USB-C Cable to your PC. On your HTC VIVE allow the connection and select File Transfer.
-
On your PC, open File Explorer and go to This PC > Device Name > Internal shared storage > Download.
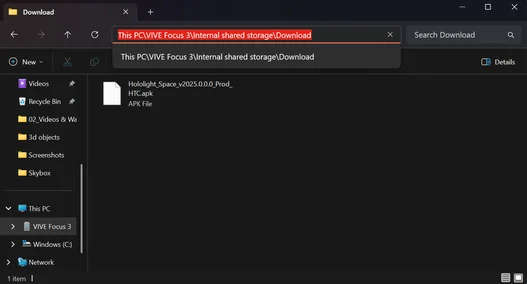
-
Copy the downloaded APK file and paste it into the Download folder.
-
Put on your HTC Vive device and open the settings menu in the main menu.
-
In the left sidebar select Storage.
-
In the central panel, select File Browser.
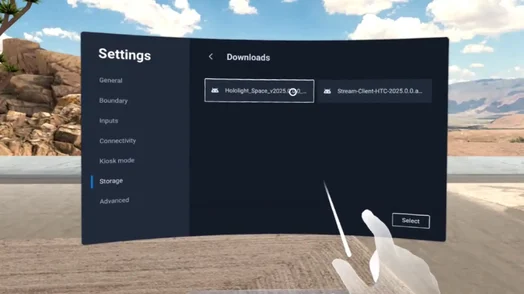
-
Select Downloads.
-
Select Hololight Space.apk to install.
If a previous version of Hololight Space Client is installed, you must uninstall it before installing the new version. In some cases, the HTC Vive device may require a restart after updating the application this way. Restart your device before opening Hololight Space from your app library.
Magic Leap 2
Since Magic Leap 2 doesn’t support a dedicated app store, you’ll need to install Hololight Space Client using Magic Leap Hub.
-
Select Download Latest Clients > Hololight Space > Magic Leap 2 > Download to download the apk file.
-
Download and install the Magic Leap Hub on your PC.
-
Open Magic Leap Hub and go to Device Bridge.
-
Power on and put on your Magic Leap 2 device.
-
Connect the Processing Unit to your PC using a USB-C cable.
-
On the device, allow the USB connection when prompted. A pop-up will appear after the USB-C cable is connected.
-
Once connected, your Magic Leap 2 will appear in the Device Bridge window.
-
Select Device Bridge > App > Install App.
-
Select the Hololight Space Client file you downloaded earlier.
After installation, you can launch Hololight Space Client directly on your Magic Leap 2.